Sunday, 27 November 2022

Children's "Biscuits" - No added sugar

Toddler Biscuit Cookie...things
Trying to find a biscuit recipe for a 20 month old toddler was a minefield of Syrups and "as much sugar as you are comfortable with for your child". Now we are not a totally no sugar household, but as a rule of thumb it is something we try to do without at the moment, will save sugar treats in the back pocket for the terrible twos!. 

So how to make a "sweet" treat...that isn't sweet?

Well, I blagged it, and our toddler devoured them, and I thankfully was paying attention to how much of what I was throwing together.

Now these are soft biscuits, somewhere on the scale towards a scone, but in shape and size little biscuits for your toddler, and as I caught her in the act of theft, apparently your partners.

Okay I think I have mentioned Child, biscuit, toddler, and young enough for Google...oh wait, cookie!

Don't feel limited by the recipe, want some nutmeg, ginger, lemon, or Orange zest? Give it a whirl, the base will handle pretty much anything you add to give it a little extra flavour. Don't like dates? Boom, literally any dried fruit will work!

Recipe and method below, enjoy :)

Recipe

- 1 banana (fresh or defrosted)
- Peanut Butter 100g
- 1 whole egg
- 2 tsp Cinnamon
- 1 tsp baking powder
- 150g flour
- 100g Oats
- 40g melted butter
- 4 Dates 

Method

Pre-heat oven to 180 degrees Celsius.

Throw banana and peanut butter (we use whole peanut crunchy as I can't get enough of it!) and the egg into a blender and whizz until a paste is formed (if using defrosted banana, take flesh and leave juice behind).

Add dry ingredients, and chopped dates to the mix.

Finally add melted butter in two parts, as you may not need the last bit. It should be a slightly sticky dough!

Now roll dough out to thickness of just over a pound coin and cut with whatever shapes you have.

In the oven for 8 - 10 minutes, then bring out and cool.

Easy as that.

After all my low sugar nonsense I may have dusted with a little icing sugar and cinnamon mixed together... But that's my lack of self control!

Hope you and you little one/s enjoy!


Friday, 28 January 2022

Linguine Vongole

Linguine Vongole (Clams)

Hey,

First and foremost - recipe, method, and link to video at the below. Read on for all the search engine good stuff!

I love seafood - and my partner LOOOVES seafood! Coming from Sardinia it's what she grew up with, this dish was inspired by those classic tastes, but was made as we successfully gathered our own Clams! 

After a day combing the beach (okay, maybe 20 mins on a beach trip) we had gathered enough Clams for tea (or dinner if you like) and decided to do one of my favourite pasta dishes with them.

I would have photo's to share - but I may have smashed my phone on waterfall walk in Wales...oops.

Spaghetti Alle Vongole - it's a classic dish with clean flavours allowing the Clams to shine. This dish has a slight twist as I have used linguine, for the very culinary reason, that's what was in the cupboard! We also had to remove the Chilli as I forgot to pick one up from the shops - off to a great start!


Linguine Vongole Recipe (for 2)

  • 150g Linguine
  • 500g Clams
  • 10-15 Cherry Tomatoes
  • 2 Cloves of Garlic
  • Parsley
  • White Wine
  • Olive Oil
  • Fresh Red Chili (Optional)
Method

This is a wonderfully quick and easy dish to put together (once you have clean clams!) and is packed full of flavour - the key is to really lightly cook the clams so that they don't become little rubber bullets!

  1. If you have managed to gather your own clams you will need to wash the shells and then purge the clams in seawater (if you have it) or salinated tap water. This is a really good blog on the process: purge-clams. If shop bought you can most likely skip the above step - but it won't hurt and may get rid of any trace elements of grit or sand in your clams.
  2. Get a pan of water on to cook the pasta, once boiling season well with salt and then add pasta to cook.
  3. As pasta is cooking it is time to get the other prep done:
    •  cut the (washed) Cherry Tomatoes in half
    • Peel and slice the Garlic
    • Chop the Parsley
    • and if you want a little heat slice the fresh Chili
  4. Get a large pan (with a lid) and put it on the stove on high heat (aim to have this on the stove with 3-4 minutes left of pasta cooking time).
  5. When pan is hot and pasta has only 2-3 minutes left add all the other ingredients (except for Parsley) into the hot pan and put the lid on:
    • Clams (drained)
    • Cherry Tomatoes
    • Garlic
    • A good splash of White Wine (about 150 ml)
    • and Red Chili
  6. Give the pan with the Clams in a gentle shake after 1 minute to encourage clams to pop open.
  7. Drain the pasta once cooked (do this quickly so that it retains some of its cooking water; into colander, back into the pan - don't leave it standing to drain), get it back into it's pan and stir in a generous glug of olive oil.
  8. Check Clams (should take 2-3 minutes to cook, once all have popped open remove the lid, and in the pasta, and the Parsley stir together gently so as not to chip an shells.
  9. Add seasoning to taste (it's a thin sauce so a little goes a long way).
  10. Serve and Enjoy!

It really is a fast dish to put together and is full of flavour.


Finished Clam Pasta bowl

Close up of Cooked Clams

As always it will be a huge help if you engage with the blog and video (below) like, comment, subscribe, and share. :)

Thanks/Bye
Rob
x


Sunday, 28 June 2020

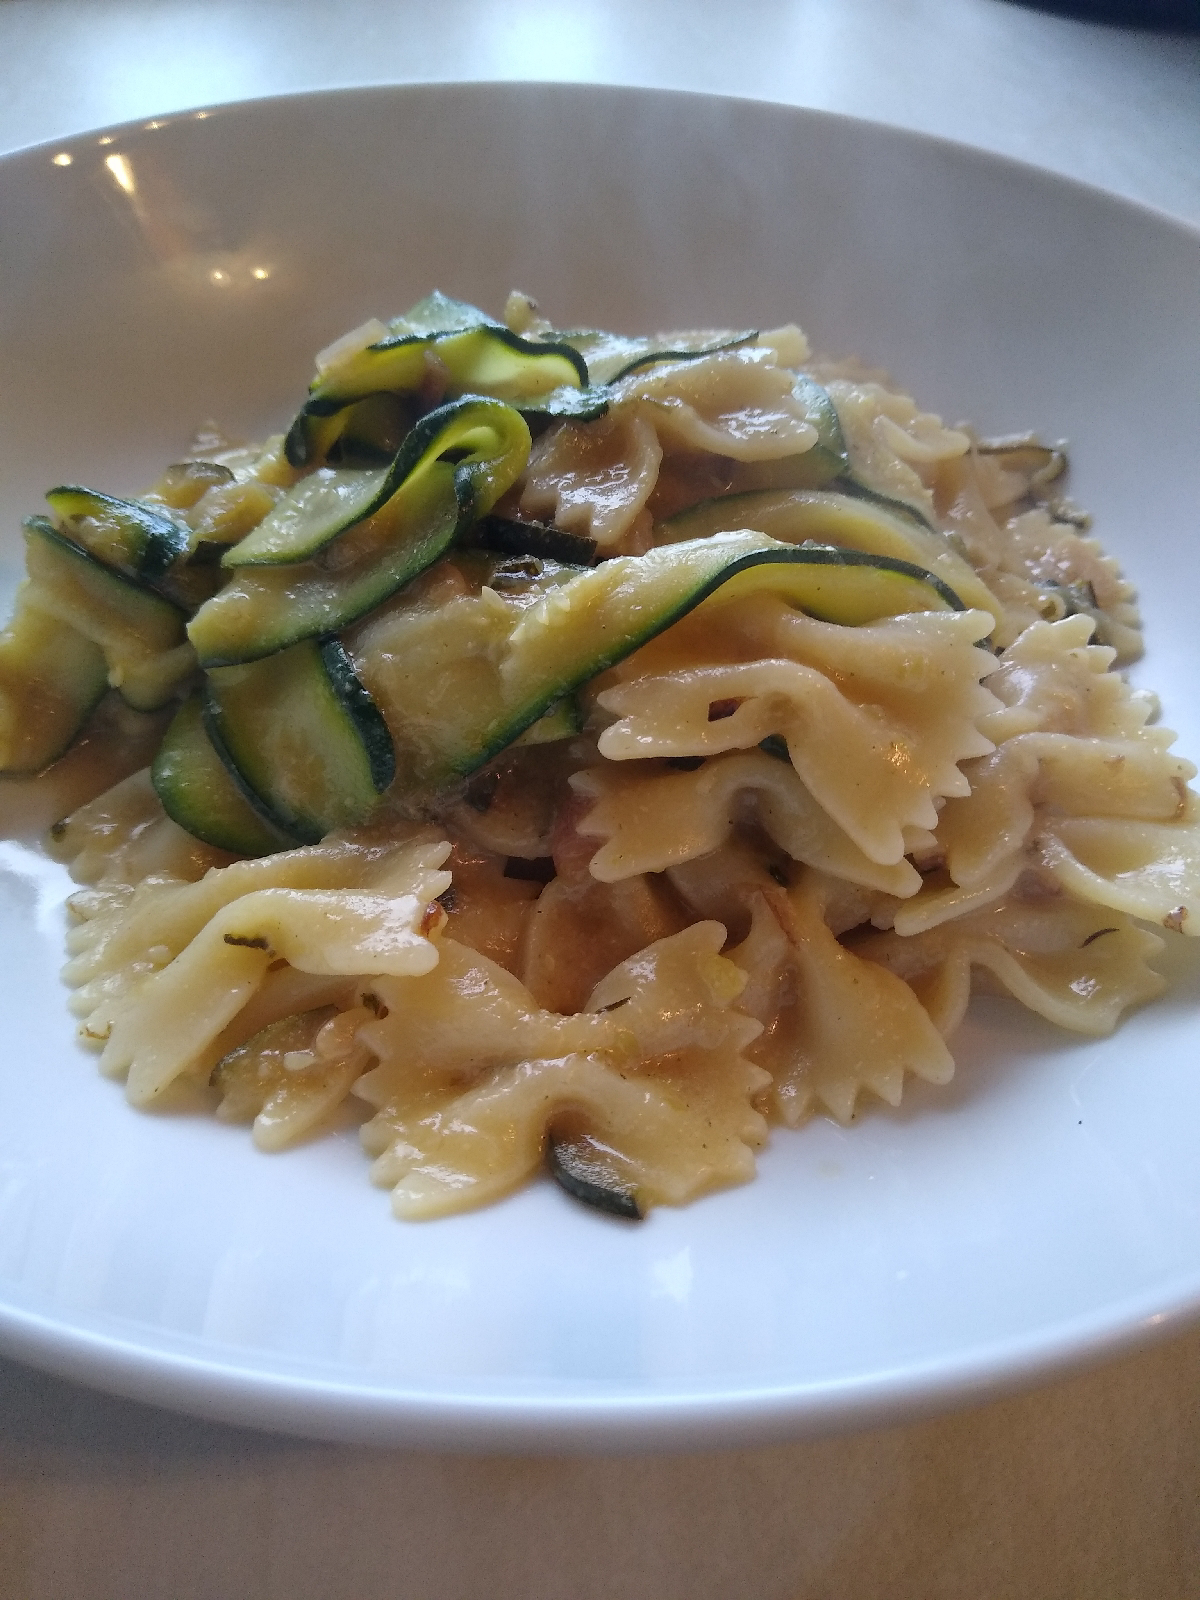
Slow Cooked Lemon & Courgette Pasta

Hi,

I am growing my own courgettes for the first time, and they are yielding a lot  - a LOT - of crop!

So I am having to start to think of different ways of using them to keep them interesting! Below is a recipe for a pasta dish I made the other night.

I used two courgettes, one was cooked down as a sauce base and the other lightly cooked to retain its fresh flavour.

Lemon & Courgette Farfalle

Cooking time 30 mins.

• 2 Courgettes
• 1/2 Lemon (Juice)
• 6 Mint Leaves
• 1 TSP Dried Oregano
• 50g Grated Parmesan
• 2 Garlic Cloves
• 1 Small Red Onion (1/2 Large)
• 200g Farfalle (or other pasta)
• 200ml Stock


Method

1. Slice the onion and start to sweat on a medium heat in a pan (we want a light caramalisation to start). Add in the Garlic (chopped up) and cook for a further minute before adding one of the Courgettes (cut into quarters length ways, then slice as thinly as you can - the aim here is to cook this into an almost puréed consistency). Get some colour into the Courgette s before adding Oregano and then covering with stock.
2. Get a pan of water on for your pasta and season heavily. Slice the remaining courgette into ribbons on a Mandolin (if you don't have a Mandolin, I would recommend cutting julienne).

3. Keep topping up the base sauce to prevent Courgettes catching in the pan. When the Courgette's are starting to breakdown (about 20 minutes) put pasta into the boiling water (put a timer on for 1 minute less than the recommended cooking time).
4. Once pasta is in the water add the Lemon Juice and grated parmesan to your sauce base.
5. Keep an eye on your sauce adding spoons of pasta water when needed to prevent it catching (this will also season, so you may need to change to adding water fr the tap to prevent over seasoning). When timer for pasta goes off drop in your Ribbons of Courgette to the pasta water. And add mint chiffonade (thinly sliced) to your sauce.
6. As soon as courgettes are translucent (30-60 seconds) drain pasta and immediately add to sauce - the Farfalle will trap some cooking water - cook out the dish on a high heat stirring constantly until you have a consistent sauce covering pasta (about 30 seconds) and then serve!


This dish would be great with some toasted pine nuts, or fresh dressed rocket on the top, or maybe a little cream running through the sauce!

Have a go and let me know how you get on, did you make any tweaks?

Whilst you're here check out my YouTube channel, slowly filling with content!

Thanks/bye
Rob
X

Thursday, 18 June 2020

Banana & Rum Soufflé

Hey,

So I don't know about you but there is only so much Banana Bread I can eat, and now I'm all smoothied out too!

Good News - I am going to share a recipe for some Banana Soufflés I made not so long ago.


Soufflés seem to have an air of mystery about them, or people believe that they are much harder to make then they really are. All a Soufflé is, is air and structure. Air to lift it up and make it fluffy, and then something to capture the air and give the Soufflé structure.

Most Soufflés use a pastry cream or fruit pureé for the structure and all Soufflés use egg whites to provide the air.

The only thing you need to be careful with when making your structure mix is the fat content - you see fat breaks down egg whites, so a high content will weaken your structure (creating a recipe for a blue cheese Soufflé still gives me nightmares!).

It is also important to note that fat can prevent you whisking your egg whites to a peak; due to this it is highly recommended to use a glass or metal bowl, as plastic can trap fat and may be the cause of failed attempts.

So I had brown banana's and decided to make up some Soufflés for after tea (or dinner depending on your north/south divide). A dash of rum beacause... I like rum! You can exclude the rum if that is your preference, but I would be careful if you decide to increase the amount as this may ruin our precious structure!


I used this recipe from Eric Ripert as a base, it  made enough for 4 x 125ml ramekins. I simply swapped out the lime juice for some Rum and a squeeze of lemon juice.

First grab hold of all the ingredients!

You need a lot less sugar than you might think - ripened bananas have plenty of natural sugars, and you don't want to make your Soufflé sickly sweet!


I added the Banana, Rum, and Egg yolk and blended together to form my structure base. I was unsure of using the egg yolk due to the fat content, but it added a nice bit of richness to the Soufflé. I didn't add any cornflour to my pureé as there is enough strength with the bananas and egg, but cornflour can be added to mixes for additional rigidity, however that comes with more weight which will result in less height in the final Soufflé bake.


You then need to whisk your egg whites, when they start to form peaks, slow down the mixer slightly and and gradually add sugar until it is all combined and you have beautiful glossy peaks.

You will then need to butter your ramekins and line them with caster sugar before combing your two mixes.


Mix 1/3 of your egg white into your structure mix until fully combined, then fold in remaining egg whites until fully combined, be gentle and take your time.

Once you are happy you can't see chunks of egg white and you have a smooth mix spoon it into the ramekins and give each one a light tap (hard enough to settle the mixture, but not so hard as to deflate it - think a gentle door knock) on the counter top to settle the mix. Then run thumb around inside edge and dust with icing sugar.


Place Soufflé in the oven on a flat tray - they should take between 8-12 minutes in a pre-heated oven. This is the perfect amount of time to caramelise some banana to serve with your souffle, simply dust with sugar and get into a non-stick pan!

Once the Souffles have risen, and the tops are golden brown they are ready to serve, get them onto the table as quickly (and carefully) as you can, with a good scoop of vanilla ice-cream and a couple of slices of caramelised banana - yum!


Really hope you have a go at this recipe, I think I may revisit this and try cooking out a banana puree first to intensify the flavour!


Recipe for Soufflé
  • 1 tablespoon unsalted butter, softened 
  • 3 dessertspoons sugar for pureé
  • 1 dessertspoon sugar for egg whites
  • 1 ripe banana
  • 1 dessert spoon rum
  • 1 large egg yolk 
  • 2 large egg whites
  • 1 tea spoon lemon juice 
Extra Caster sugar used to dust Ramekins. Optional extra Caramelised Banana + Sugar for garnish.
separate.

Anyway please watch the below short video of this recipe - like, comment, and subscribe!

Thanks/bye
Rob
x


Friday, 13 March 2020

Houmous or is it Hummus... Chickpea and Tahini dip!


First things first, how the devil am I supposed to spell it? It had not previously occurred to me that the spelling of one of Britain's (if not the most) loved dips would be so contentious!

I have the spelling of "Houmous" so deeply ingrained I don't know if I can convert to writing Hummus, and it all seems to stem from translation from Arabic not being straight forward due to differing alphabets.

Personally I would be on board with Hummus as it seems to tie in more closely to the dishes origin...but as previously alluded too, I think I have Houmous in the veins!

Now you may be wandering why you'd want to make something that is so readily available in store...and the answer is the same as every other dish you make; it. will. taste. better!

The best part about making Houmous at home is that you can play with the flavour profile, want a little extra garlic kick? Go ahead an put another half clove in! Want some spice running though? Add 1/2 tsp of Cumin!

You get the idea!

The recipe I used is below (and a quick video if you're not sure on how to make this simple and delicious dish).


Recipe

1 x Tin of chickpeas*
1 x Lemon Juice
1 x tsp Tahini
1 x tsp Salt
3 x tbls Olive Oil
1 x Garlic Clove

*If you are confident I would highly recommend using your own cooked chickpeas - but be warned that you need to prepare in advance!


Method

This is the easy part, put all together (only use half the lemon juice to start) in a blender and blitz up into a smooth paste - add water a little at a time to loosen the mix to the right consistency and remember to check your seasoning (add more lemon juice if needed - the juice should lift the flavours not over power them, so stop adding juice before the lemon becomes too strong!)

Anyway please watch the below short video of this recipe - with some home made Flatbread if you want to create a nice antipasti (like, subscribe - we all know the youtube drill!).

Thanks/bye
Rob
x


Tuesday, 13 August 2019

Sweet Potato Gnocchi

I have made a lot of Gnocchi, but I had never made a sweet potato Gnocchi. I wasn't certain it would even work, the first thing you learn about making Gnocchi, the drier your mash the better! And if there is one thing that I know about a sweet potato and that is it makes a wet mash - surely it can't work?!


It did...sort of!

First things first - I need a recipe, as everything I have isn't going to work - wrong potatoes! I had a look at a few different recipes online, and quickly realised that they followed the same rules as normal Gnocchi...just more flour.

So I decided against using a recipe - and decided to add flour in small quantities until I got what I thought was a good Gnocchi dough consistency.

That is where I came a little unstuck - I knew sweet potato mash was going to be wet (I had even strained my mash through a muslin, removing 100ml of excess fluid) - what I hadn't realised is that the dough would have to be worked with wet - otherwise you end with too much flour in your mix, which leads to a (heavens forbid) tough Gnocchi!

As the mix is wet I avoided the use of eggs (which are contentious enough in Gnocchi), and stuck to a mix of sweet potato, flour, salt, and a little parmesan.


As mentioned earlier I was adding flour little by little, and with the dough being so wet I had put in 400g of flour before I made a sample Gnocchi to see how the mix held up, the good new was, despite the wetness of the dough, the Gnocchi firmed up and floated to the surface. The bad news? To my fussy palate I had overstepped the flour mark, it was bordering on the brink of having to chew!

If I was to do this recipe again - I would test at 200g and see where the mix was at - as the extra 200 I had added - really did very little to dry the dough. And less flour in Gnocchi is what we should all be aiming to achieve!


When it comes to serving Gnocchi it's really versatile and can be partnered with so many things. However, as this was my first time making sweet potato Gnocchi I wanted the dumplings to be the main flavour of this dish and kept it simple; butter, sage, sunflower seeds, rocket, and a little Parmesan to finish!

Overall I am pretty happy with the results - I need to try again with lower flower quantity and see how that works for me - if you give it a try i'd love to here how you did!

Anyway please watch the video below (like, subscribe - we all know the youtube drill!)

Thanks/bye
Rob x


Monday, 17 December 2018

Falling behind

Hey,

So we've moved house. It's been chaotic, and half my kitchen equipment is still in boxes. On top of that I may (I did) have factory reset my phone and lost all my logins etc...

So it's been quite some time since I have put any content - anywhere!

I am still not sure how best to do a video in the new kitchen (I have only produced one since the move - only using photos) as the layout makes it tricky.

I will find a way around this and put something up over the holiday season!

In the meantime my Dad's birthday is coming up and I am making dinner for him. I am in the planning stage at the moment - it's proving difficult as I won't e cooking at home, so I don't know what equipment will be available...eurgh!

This is where I am up to now:

Amuse

Espresso cup with a 'cappuccino' soup (soup with some froth on the top) either:

  • Pea and Mint
  • Asparagus
  • Leek and Potato.


Starter

Going to do a Scallop starter, currently torn between:

  • Scallops with pea puree, spiced foam, and pea shoots (unless pea soup used in which case this gets ditched)
  • Scallops with Watercress puree, butternut squash puree, watercress, and pancetta
  • Scallops with Celeriac puree crumbled black pudding, truffle oil, and watercress
...a bit of a puree theme.

Main

  • Pork belly with sweet potato dauphinoise, purple kale, and red wine sauce
  • Pork belly with sweet potato dauphinoise, pork scratching, roast garlic sauce, and Rocket
  • Pork belly with sweet potato dauphinoise, pak choi, and 5 spice sauce
(The pork would be seasoned based on what it is served with)

Dessert

  • Sticky toffee pudding with toffee sauce and clotted cream
  • Creme brulee
  • Tarte fine with ice cream
  • Tart tatin with ice cream

Oh...I'm doing this in two days.
Oh...I'll have 6 hours to do it.
Oh...I'm relying on someone to get the ingredients I want.
Oh...shit!

I'll let you know how I get on - hopefully get some pictures for you all!

Take care,

Rob